Why Hummingbird Feeders Need Different Care
If you want to know how to clean a hummingbird feeder properly, start with the fact that nectar behaves very differently from dry seed. When you are learning basic bird feeder tips, many of the maintenance habits are built around seed, hulls, droppings, and moisture. A nectar feeder adds a sugar solution that can support mold, yeast, and other microbial growth when it sits outside. That is why the refill interval matters as much as the scrubbing itself.
Dry seed can also spoil, especially when it gets wet or sits in humid conditions, so I would not treat a seed feeder as maintenance-free. The difference is speed. Sugar water can ferment or grow mold within days, and hot weather shortens that window further. A hummingbird feeder therefore needs a tighter routine than most seed feeders even when both look clean from the outside.
If you clean a bird feeder that holds seed, much of the work is removing hulls, droppings, damp debris, and old food. With a nectar feeder, you also have to inspect every surface that touches sugar water, including the base, ports, seams, threads, and removable guards. I think of the reservoir as only one part of the job. The little pieces are often where a quick rinse misses residue.
How Often Do You Actually Need to Clean It?
How often to clean a hummingbird feeder depends mainly on heat, sun exposure, and how quickly the nectar is being used. Cornell Lab recommends changing sugar water at least every three to five days and more often in hot weather, while Project FeederWatch advises cleaning hummingbird feeders every couple of days and ideally whenever they are refilled. Audubon gives an even tighter hot-weather schedule, with daily or every-other-day cleaning during heat. The practical takeaway is that a weekly routine is only a ceiling for cooler conditions, not a summer default.
For a broader bird feeder cleaning schedule, seed feeders can usually run on a longer interval when conditions are dry and birds are healthy. Nectar does not give you that same margin. I would rather make a smaller batch and replace it early than fill a large reservoir and try to stretch the nectar for a week. That one change makes the cleaning routine easier because less old sugar water has time to coat the feeder.
| Outdoor Temperature | Cleaning Frequency | Signs to Look For |
|---|---|---|
| Cool or mild weather | Change nectar every 3 to 5 days; clean at least weekly and preferably at refill | Do not wait for visible spoilage before changing it |
| Warm weather | Change nectar and clean about every 2 to 3 days | Shorten the interval if the feeder sits in sun or nectar starts clouding |
| Very hot weather, around 90°F and above | Change nectar daily or every other day and clean at each refill | Discard immediately if you see cloudiness, mold, strings, or unusual residue |
Use that table as a starting point, not as a laboratory expiration chart. Shade can slow spoilage, while direct sun and very hot afternoons can shorten the useful interval. A feeder that is emptied quickly still needs cleaning before the next batch because sugar residue remains on the surfaces. The safest routine is to clean before the nectar looks or smells bad, not after.
The No-Soap Rule, With One Important Caveat
Guidance on dish soap is not perfectly uniform. Cornell Lab’s current hummingbird-feeder cleaning page says to use hot water and a bottle brush and not to use soap or detergent, while Project FeederWatch currently allows warm water with dish soap as long as the feeder is rinsed thoroughly. Because the recommendations differ, I use the simpler low-residue routine for nectar feeders: hot water and a dedicated brush for ordinary cleaning. That avoids turning a routine wash into a debate over how much detergent is too much.
The part that matters most is physical cleaning. Take the feeder apart, remove visible film and dried sugar, scrub the crevices you can reach, and rinse every surface thoroughly. I would not claim that one trace of dish soap will automatically poison a hummingbird or that birds can taste a microscopic detergent film, because the evidence does not support that kind of certainty. The practical reason to skip scented detergent is simply that you do not need it for every routine wash when hot water, brushing, and proper rinsing are already doing the main work.
Giving a nectar feeder a quick soak in heavily scented detergent and assuming bubbles have cleaned the ports and seams.
Taking the feeder apart, scrubbing it with hot water and dedicated brushes, then using a properly diluted vinegar or bleach solution when a deeper clean is needed.
Vinegar is one option, but it is not the only bird-safe cleaning method. South Carolina DNR lists four parts hot water to one part white vinegar, or nine parts hot water to one part bleach, for nectar feeders. If you use either solution, scrub the feeder, rinse it thoroughly with clean water, and let it air dry before refilling. Never mix vinegar and bleach, because that combination can release dangerous chlorine gas.

A ready-to-mix hummingbird nectar concentrate made from 100% sucrose that mimics real flower nectar. The vibrant red color naturally attracts hummingbirds. One 32 oz bottle makes up to 96 oz of nectar at a 3:1 or 4:1 mixing ratio. No boiling or refrigeration needed - just add water.
Check on AmazonIf you click this link and buy, we earn a commission at no additional cost to you.
The Port-First Cleaning Approach
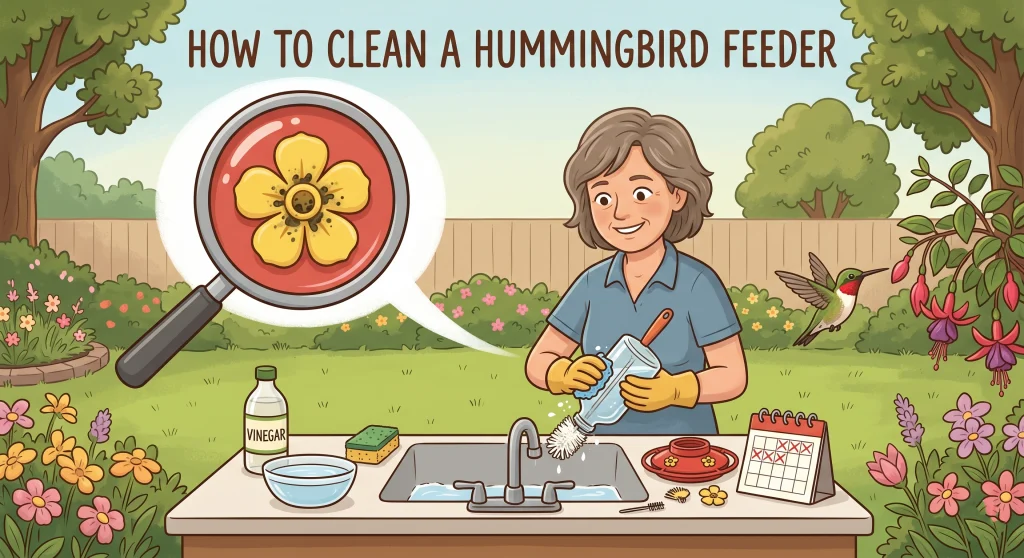
Proper hummingbird feeder cleaning starts by taking apart every component the feeder is designed to release. Swishing hot water around the reservoir is not enough if nectar also touches a removable base, feeding flowers, bee guards, seals, or threaded connections. Those small areas are easy to skip because the bottle is the part you can see most clearly. I use a port-first routine mainly as a reminder not to finish the easy part and forget the fiddly parts.
The feeding ports are not automatically the dirtiest part on every design, but they deserve deliberate attention because they are small and can trap residue around their edges. A long bottle brush is useful for the reservoir, while a narrow feeder brush or pipe cleaner can reach ports and channels that a normal kitchen brush cannot. If a feeder has a crevice that you cannot open, inspect, or scrub, that is worth remembering the next time you replace it. Easy disassembly is one of the most useful maintenance features a hummingbird feeder can have.
- Disassemble everything: Separate the reservoir, base, removable flowers, bee guards, and other pieces according to the feeder’s instructions.
- Rinse away old nectar: Empty the feeder and rinse loose sugar residue before you start scrubbing so you are not working through a sticky film.
- Scrub the ports and seams: Use a small dedicated brush or pipe cleaner sized to the opening. A cotton swab can work on an accessible surface, but avoid leaving fibers behind inside narrow ports.
- Clean the reservoir and threads: Brush the bottle, base, screw threads, seals, and any groove where nectar can collect or dry.
- Use one cleaning solution when needed: Choose either diluted vinegar or diluted bleach for a deeper clean. Never combine them, and follow the feeder material’s care instructions.
- Rinse and air dry: Rinse every part thoroughly with clean water and let the feeder dry before reassembly and refilling.
Pro Tips: Keep the small port brush with the rest of your nectar supplies instead of in a general cleaning drawer. If the right brush is within reach every time you refill, the small openings are much less likely to become the part you postpone.
A feeder that is difficult to clean will eventually make the routine harder than it needs to be. I would rather use a simple design that comes fully apart than a decorative feeder with sealed channels I cannot inspect. The goal is not to make the reservoir shine. The goal is to reach every surface that repeatedly contacts nectar.

A hummingbird feeder cleaning kit praised for reaching drinking spouts and making hard-to-clean feeders easier to maintain. Brush flexibility and sizing may vary by feeder type - some brushes may be too large for smaller flower holes. Durability is mixed, with some users reporting the main brush breaking early.
Check on AmazonIf you click this link and buy, we earn a commission at no additional cost to you.
Don’t Forget the Ant Moat
Complete hummingbird feeder maintenance extends slightly beyond the nectar reservoir. If your setup uses a built-in or hanging ant moat, that small cup is part of the routine too. Its job is simple: clean water creates a barrier that ants cannot easily cross on their way down the hanger. When the moat dries out or fills with debris, it stops doing that job well.
Whenever I take a nectar feeder down, I check the moat at the same time. Dump old water, remove dead insects or debris, rinse the cup, and refill it with clean tap water. Do not fill an ant moat with vegetable oil, petroleum jelly, or another sticky substance. Cornell Lab specifically recommends water because greasy materials can contaminate nectar or mat a hummingbird’s feathers if the bird contacts them.
A deeper moat may hold water longer in hot weather, but no moat is maintenance-free. Check it between feeder cleanings if evaporation is fast, especially on exposed hooks in full sun. Keeping the moat functional is a small job, but pairing it with the nectar routine means it is much less likely to be forgotten.
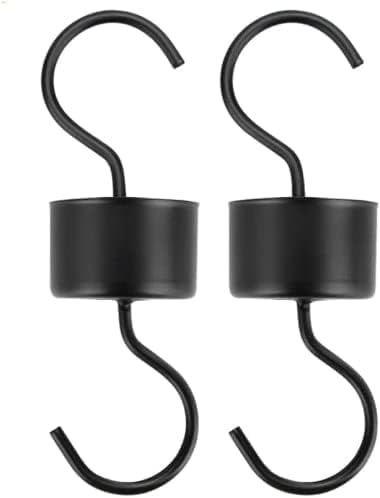
A stainless steel ant moat that hangs in-line between the hook and feeder to keep ants away from hummingbird and oriole feeders. Simply fill the cup with oil or water to create a natural ant barrier. Measures approximately 5 inches tall and 1.5 inches wide. Safe for birds and compatible with most hanging feeders.
Check on AmazonIf you click this link and buy, we earn a commission at no additional cost to you.
Final Thoughts on Nectar Maintenance
Keeping a nectar feeder clean is mostly about building a repeatable routine. Use smaller nectar batches, take the feeder apart at refill time, scrub the reservoir and the small parts, and shorten the interval as the weather gets hotter. If you see cloudiness, mold, or residue before the scheduled cleaning, discard the nectar and clean the feeder immediately. That is more reliable than trying to stretch one batch until it looks obviously bad.
The easiest setup to maintain is the one you can fully disassemble and reach with a brush. I would not rely on smell, bird activity, or a clear-looking bottle to decide whether the feeder is still clean enough. Keep the schedule simple, keep the brushes nearby, and treat the ports and seams as seriously as the reservoir. Consistency is what makes hummingbird feeder maintenance manageable over a full season.
FAQs
🧽 Can I put my hummingbird feeder in the dishwasher?
Only if the feeder manufacturer says the parts are dishwasher-safe. Cornell Lab notes that suitable feeders can be cleaned in a dishwasher on a hot setting, but Project FeederWatch also warns that not every feeder is dishwasher-safe. If you are unsure about the plastic, seals, paint, or removable parts, hand washing is the safer choice.
🧪 Does bleach work better than vinegar for mold?
Both can be used correctly, but they do different jobs. South Carolina DNR lists either four parts hot water to one part vinegar or nine parts hot water to one part bleach for nectar feeders, while dilute bleach is the stronger disinfecting option. Never mix vinegar and bleach, and rinse the feeder thoroughly before letting it air dry.
🌸 How do I clean the tiny plastic flowers on the base?
Remove them first if the feeder is designed for them to come off. Use a small feeder brush or pipe cleaner that fits through the port, then scrub around the edges and any groove where sugar residue collects. Rinse carefully so no loosened debris or cleaning solution remains inside the opening.
🐝 Will the smell of vinegar repel the birds?
You should not refill the feeder while it still smells strongly of cleaning solution. Rinse every part thoroughly with clean water and let it air dry before adding fresh nectar. Proper rinsing is the important step, rather than trying to predict whether a hummingbird will react to a faint odor.
☀️ Do I need to wash the feeder if the birds empty it in two days?
Yes. Project FeederWatch recommends cleaning hummingbird feeders ideally every time they are refilled, even when the birds empty the nectar quickly. A quick disassembly, scrub, thorough rinse, and refill keeps residue from building up between batches.