
Recognizing When Routine Cleaning Is Not Enough
I have seen plenty of feeders that looked worse than they actually were, with old hulls and seed dust packed into corners. Those are routine cleaning problems. The point where I change tactics is when the food itself is damp or spoiled, visible fuzzy growth is present, or residue has built up where a normal wash cannot reach it easily.
A sour or musty smell, wet clumps, sprouting seed, or fuzzy growth in any color is enough reason to discard the food and clean the feeder. You do not need to identify the exact mold species by sight, and you do not need to assume every unseen surface is coated with dangerous spores. The useful question is whether contaminated food or residue has reached parts of the feeder that birds contact or that fresh seed will touch.
Treating spoiled seed seriously is one of the basic bird feeder tips that reduces avoidable disease risk. Moldy feed can expose birds to large numbers of fungal spores, and USGS specifically advises removing moldy feed from bird feeders. The cleaning job is less dramatic than “removing root structures”: first remove the contaminated food and physical residue, then disinfect cleanable surfaces and dry the feeder before refilling.
The Tools You Need Before You Start
Before you take anything apart, you need to gather the right supplies. Trying to do a deep clean without the proper brushes is incredibly frustrating and usually leads to poor results.
- A long-handled bottle brush: Use one that actually reaches the bottom and corners of your tube feeder without scratching the material.
- A dedicated port brush: Small brushes or pipe-cleaner-style tools help reach feeding ports, seams, and crevices that a large bottle brush misses.
- Soap and hot water: Useful for physically removing grime from compatible seed feeders before disinfection.
- Standard household chlorine bleach: Cornell recommends no stronger than one part bleach to nine parts water for disinfecting seed feeders.
- A clean bucket or basin: Use a container large enough for the washable parts you plan to soak, and never reuse a container that still holds vinegar or another cleaner when you prepare bleach.

This 19-piece hummingbird feeder cleaning set includes three brush sizes for reaching reservoirs, feeding ports, bottle holders, and other narrow areas. The largest brush has a double-ended design for cleaning both nectar bottles and smaller feeder components, while the medium and small brushes handle tighter spaces. Nylon bristles combined with stainless steel and plastic handles provide a practical reusable set for routine bird feeder cleaning.
Check on AmazonIf you click this link and buy, we earn a commission at no additional cost to you.
The 4-Step Sequence for a Moldy Feeder
The biggest mistake is treating disinfection as a substitute for cleaning. Cornell’s guidance separates the jobs: scrub away debris and old seed, then use a dilute bleach soak as an effective additional disinfection step. Organic material can shield parts of the feeder from a disinfectant, so the physical cleaning comes first. After that, rinse and dry the feeder completely before adding fresh food.
Step 1: Discard the Seed and Disassemble the Feeder
Take the feeder apart as far as the manufacturer intends. Remove detachable perches, trays, ports, bases, and lids so you can reach the food-contact surfaces. Discard wet or moldy seed in the trash rather than scattering it under the feeder or trying to save the dry-looking portion on top.
I would not start with a one-hour vinegar soak or claim that household vinegar kills the vast majority of fungal spores. Project FeederWatch lists diluted vinegar as a possible bleach alternative, but it also warns that not all bleach alternatives meet disinfectant standards. For a visibly moldy seed feeder, I prefer to remove the physical contamination first and use the better-supported bleach step after scrubbing.
Step 2: The Physical Scrub
You cannot skip the mechanical cleaning. Wash compatible parts with soap and hot water or another method allowed by the feeder manufacturer, then scrub the tube, hopper, tray, ports, seams, and corners until visible seed residue and mold are gone. Use enough pressure to remove the buildup without damaging plastic, coatings, or seals.
Field Note: One place I learned to check carefully was the underside of feeding ports and the seam where a tube meets its base. Those areas can look clean from the outside while old seed residue remains tucked behind an insert. I use a small brush or swab as an inspection tool rather than assuming a dark mark proves active mold.
Once the visible residue is gone, rinse away the soap and loosened debris before moving to the disinfecting step.
Step 3: The Deep Disinfect
Now disinfect the clean, bleach-compatible parts. Cornell recommends a dilute solution no stronger than one part household bleach to nine parts water, with a ten-minute soak as a very effective step after scrubbing. More bleach is not better. Follow the feeder manufacturer’s material guidance, use good ventilation, and keep the solution away from children and animals.
Warning: Never mix chlorine bleach with vinegar, ammonia, or other cleaners. Combining bleach with acids can release chlorine gas. If vinegar or another cleaner was used earlier, rinse the feeder, brushes, bucket, and work area thoroughly and prepare the bleach solution separately.
Step 4: The Complete Air Dry
After the bleach soak, rinse every part thoroughly with clean water. Air drying is the easiest way to finish because the feeder needs to be completely dry before seed goes back in. A clean lint-free towel is not inherently unsafe, but I still let interior tubes, seams, and ports air dry so I can see that no moisture remains trapped.
Lay the parts in a clean, well-ventilated place until they are completely dry. Sunlight can help with drying, but it is not the disinfection step. Do not refill while water is pooled in a tube, seam, or tray because damp seed spoils much more easily.

6 feeding ports with perches let multiple birds feed at once. Transparent 2 lb seed chamber makes it easy to see when to refill, with a simple flip-top lid for quick access. Built-in drainage keeps seed dry and mold-free. Works with sunflower, nyjer, safflower, mixed seed, and more. A great gift for any bird lover!
Check on AmazonIf you click this link and buy, we earn a commission at no additional cost to you.
Do Not Treat Every Oxygen Bleach as a Disinfectant
Oxygen-based laundry cleaners can be useful stain removers on compatible materials, but stain removal and disinfection are not the same thing. I would not call a generic oxygen bleach superior to chlorine bleach for a moldy bird feeder. Project FeederWatch specifically cautions that not all bleach alternatives meet disinfectant standards.
If you use an oxygen-based cleaner for cosmetic staining, follow that product’s label and the feeder manufacturer’s material instructions, then rinse thoroughly. Do not substitute a laundry stain remover for the bleach disinfection step unless the exact product is labeled and validated for the disinfection job you are asking it to do. A feeder can also remain cosmetically stained after it is physically clean, so color alone is not a reliable test of sanitation.
If mold keeps returning, the more useful question is why moisture and spoiled food are recurring. My main page on mold in your bird feeder covers those causes, including wet seed, poor drainage, storage problems, and food sitting outside too long.

Oxygen-powered formula with over 101 uses for laundry and around the home. Works as a presoak, in-wash booster, and all-purpose cleaner for kitchens, bathrooms, floors, and furniture. Safe on whites, colors, and dark fabrics. Chlorine-free, color-safe, and septic tank safe.
Check on AmazonIf you click this link and buy, we earn a commission at no additional cost to you.
When to Throw the Feeder Away Entirely
Sometimes, no amount of scrubbing or soaking will save your setup. Over time, I have watched customers spend hours trying to salvage a cheap piece of plastic that was structurally compromised. Knowing when to quit is just as important as knowing how to clean.
Plastic can become brittle, crazed, scratched, or warped with age and weather exposure. Replace a feeder when cracks, damaged seams, inaccessible cavities, or distorted parts prevent you from cleaning and drying it reliably. Permanent discoloration by itself does not prove that bacteria are living inside the material or that fresh seed will be immediately contaminated, so judge the feeder by its physical condition rather than color alone.
Continuing to use a cracked, warped, or permanently clouded plastic tube just because it was expensive five years ago.
Replacing the unit when cracks, warping, damaged seals, or inaccessible surfaces make thorough cleaning and drying unreliable.
The same logic applies to warped parts. If the base no longer fits, drainage is blocked, or rain can enter through a damaged joint, replacing the failed part or the feeder is reasonable. Do not assume the item belongs in curbside recycling, though, because mixed plastics, metal hardware, and local recycling rules vary.
What to Look for When You Replace Your Feeder
If you have decided it is time to start fresh, do not just buy the same design that caused the problem. You want to look for specific features that actively prevent mold from taking hold in the first place.
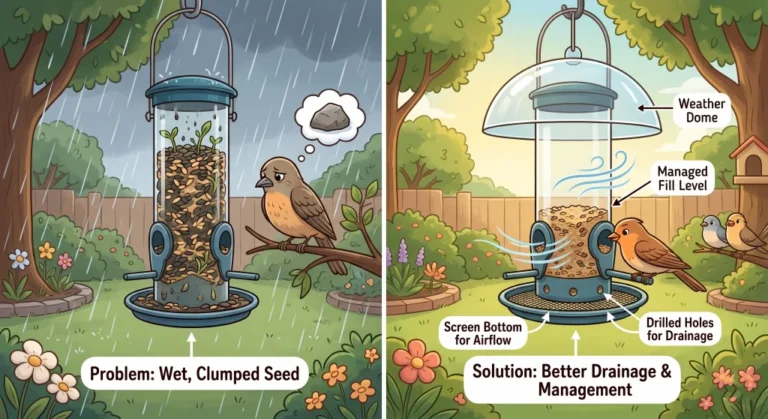
First, check how the feeder handles water. Drainage holes, screened sections, and a base that does not trap rain can help wet seed dry faster and reduce standing moisture. No design keeps seed dry under every storm, so you still need to inspect the food after wet weather and discard anything that has spoiled.
Second, choose a feeder you can actually take apart, inspect, scrub, rinse, and dry. Durable UV-resistant materials can be helpful, but I would not promise that one plastic type lasts a set number of seasons or prevents fungal contamination. Ease of cleaning, replaceable parts, drainage, and weather protection matter more than a material label by itself.

This squirrel-resistant hanging bird feeder holds up to 2.4 pounds of seed and provides four feeding ports for backyard birds. Its weight-activated shroud closes access to the seed ports when a squirrel climbs onto the feeder, while the wire exterior gives clinging birds additional feeding access. Chew-resistant materials, seed ventilation, and tool-free component removal help make routine filling and cleaning more manageable.
Check on AmazonIf you click this link and buy, we earn a commission at no additional cost to you.
Final Thoughts: Preventing the Next Emergency
Cleaning a badly spoiled feeder takes more work than routine maintenance, so prevention is worth the effort. Put out only as much food as birds can use while it remains fresh, inspect feeders after wet weather, keep stored seed cool and dry, and clean often enough that old residue never becomes a thick layer.
A feeder can concentrate birds and contamination in one place, so careful maintenance matters. A clean, dry feeder cannot guarantee that no disease will ever occur, but removing spoiled food and keeping equipment sanitary reduces an avoidable source of exposure.
FAQs
🧤 Do I need to wear gloves when handling spoiled bird seed?
Gloves are a sensible precaution when handling moldy seed or a heavily contaminated feeder, and wash your hands afterward. If the material is very dusty or mold is extensive, avoid breathing the dust; CDC recommends respiratory and eye protection for significant mold cleanup, especially for people with asthma, lung disease, allergies, or immune suppression.
🪵 Can I use bleach on a wooden hopper feeder?
Not as a universal rule. South Carolina DNR specifically includes wooden feeders in its bleach-cleaning guidance and emphasizes letting them air dry completely. Because wood finishes, glues, and construction vary, follow the feeder manufacturer’s instructions and avoid prolonged soaking if the feeder is not designed for it.
☀️ Will leaving a moldy feeder out in the hot sun kill the fungus?
Sunlight can help the feeder dry, but leaving a moldy feeder in the sun is not a substitute for removing contaminated seed, scrubbing away residue, and using an appropriate disinfection step on compatible parts.
🗑️ Can I compost moldy bird seed instead of throwing it in the trash?
For a household feeder, bagging heavily spoiled seed and putting it in the trash is the simplest option because it keeps wildlife from eating it again. I would not claim that a small amount will overwhelm a compost system with fungal spores, but viable seed can also sprout and contaminated food is not something I want redistributed around the feeding area.
🧼 Can I use dish soap instead of vinegar for the first step?
For seed feeders, soap and hot water are useful for the cleaning step because they help remove physical grime and organic residue. Cornell then recommends dilute bleach as the stronger disinfection step. Vinegar can be used as an alternative cleaner, but I would not describe its acidity as more reliable for killing fungal spores.