
Identifying the Problem: Is It Actually Mold?
If you notice dark spots near the ports or at the bottom of a tube, do not diagnose the problem by color alone. Wet sunflower hulls, seed dust, dried droppings, and grime can all stick to clear plastic and look worse than they are. Mold can also appear white, green, gray, brown, or black, so a black patch is not automatically a specific “black mold” or Aspergillus species.
What I look for first is texture and condition. Fuzzy or spreading growth, seed that has clumped together after getting damp, a musty or sour odor, or residue that returns in a moisture-prone corner are stronger reasons to treat the feeder as contaminated. If the mark wipes away as ordinary dirt and the seed is dry and fresh-smelling, you may simply be looking at a dirty feeder that needs routine cleaning.
Field Note: One place I learned to check carefully is directly below feeding ports and at the lowest part of a tube. Moisture can enter around ports, wet the seed nearby, and then settle where drainage is weakest. I have seen dark, stuck-on hulls mistaken for mold there, but I have also seen real fuzzy growth hiding behind the same kind of buildup. I do not try to name the fungus by sight. I treat suspicious growth as a cleaning problem and fix the moisture source.
Once you see genuine growth or spoiled seed, take the feeder down rather than waiting for birds to finish the food. The exact mold species matters far less to a backyard feeder owner than removing the contaminated material and stopping the damp conditions that allowed it to grow.
Why You Cannot Ignore a Moldy Feeder
Moldy seed is not something I leave out and hope birds will sort around. Wildlife agencies warn that wet, moldy seed and hull buildup around feeding areas can contribute to fungal problems, including aspergillosis, which can cause respiratory distress in birds. A busy feeder also concentrates birds around the same food and surfaces, so poor sanitation creates more opportunity for contaminated material to be contacted and scattered.
The practical response is simple. If seed is visibly moldy, wet and musty, or heavily clumped with fungal growth, discard it in the trash rather than spreading it on the ground. Also remove spoiled seed and hulls beneath the feeder, because ground-feeding birds can still reach material that you dumped out of the reservoir.
This is one of the less glamorous but more important bird feeder tips I give beginners. Attraction comes second to keeping food fresh and the feeding area clean. If a feeder smells wrong or has visible growth, that is enough reason to stop using it until it has been properly cleaned and dried.
Why Soaking Alone Is Not Enough
Bleach is not the problem here. In fact, a dilute bleach solution is one of the standard disinfection methods recommended for seed feeders. The mistake is assuming that a chemical soak replaces the physical cleaning step.
Seed dust, hull fragments, droppings, and other organic debris can cling to corners, seams, ports, and the bottom of a reservoir. I want that material physically removed before I call the feeder clean. Scrubbing also exposes the actual surface so the disinfecting step can do its job instead of working through a layer of debris.
Dumping the bad seed, soaking a still-dirty feeder, giving it a quick rinse, and immediately refilling it while residue remains in the ports or bottom.
Disassembling the feeder, removing stuck seed and debris, scrubbing every reachable surface, disinfecting with an appropriate solution, rinsing thoroughly, and allowing every part to dry completely.
That sequence matters more than chasing a stronger chemical. When I see mold return quickly after cleaning, I first question whether hidden debris remained or whether the feeder went back outside still damp. The next question is whether rain, poor drainage, or old seed is recreating the same wet conditions.

Oxygen-based, water-activated formula tackles tough dirt, spots, and set-in stains on clothes, carpets, upholstery, and nearly any surface. Works alongside regular detergent for extra cleaning power. Chlorine-free and color safe.
Check on AmazonIf you click this link and buy, we earn a commission at no additional cost to you.
Choosing the Right Cleaning Solution
For ordinary seed feeders, the most consistently supported deep-cleaning options are hot soapy water followed by thorough rinsing, or a dilute household bleach solution after the debris has been scrubbed away. For disinfection, a common wildlife-agency ratio is one part household bleach to nine parts water. The feeder should then be rinsed thoroughly and allowed to dry completely before any seed goes back in.
Diluted vinegar is sometimes used as an alternative when someone does not want to use chlorine bleach, but I do not describe vinegar as automatically equivalent to bleach for disinfection. Project FeederWatch notes that bleach alternatives can add protection without necessarily meeting the same disinfectant standard. If I am responding to visible mold on a seed feeder, I prefer a method with clear wildlife-agency guidance rather than assuming any acidic or oxygen-based household cleaner is interchangeable.
I also would not make a laundry oxygen booster the default bird-feeder disinfectant simply because it is chlorine-free. If you use any cleaner beyond the standard methods above, confirm that the feeder material tolerates it, follow the product label, and rinse away all residue. More chemical strength is not a substitute for scrubbing and drying.
A bottle brush, small detail brush, or other dedicated tool is useful because the difficult areas are usually the ones you cannot reach with a sponge. Feeding ports, seams, screw threads, tray corners, and the bottom of a tube deserve the most attention. Keep those tools for feeder cleaning rather than moving them back and forth between feeders and food-preparation surfaces.
Warning: Never mix chlorine bleach with vinegar, ammonia, or other household cleaners. Choose one cleaning chemistry at a time, rinse thoroughly, and work in a well-ventilated area while wearing appropriate gloves.

17-inch brush with a 4-inch scrubbing head for reservoirs and tubes, plus a 1.5-inch ball tip for feeding ports and tight curves. Non-scratch nylon bristles safe for glass, plastic, and acrylic. Flexible twisted wire handle reaches the bottom of tall bottle feeders with ease. Works on hummingbird feeders, oriole feeders, and any tube-style nectar feeder.
Check on AmazonIf you click this link and buy, we earn a commission at no additional cost to you.
Wooden Feeders Need More Drying Time
Wood does require extra care, but I would not use the blanket rule that chlorine bleach can never touch a wooden feeder. Wildlife guidance that covers feeder cleaning specifically emphasizes thorough rinsing and complete air drying, especially for wood. The bigger practical problem is that wood absorbs moisture into joints, grain, and cracks, so it can stay damp long after a plastic tube looks dry.
Start by removing all loose seed and debris, then scrub the surfaces you can reach. If you use a dilute disinfecting solution that is appropriate for the feeder, do not leave concentrated chemical sitting in the wood. Rinse thoroughly and move the feeder to a dry, well-ventilated place.
I do not use an arbitrary forty-eight-hour timer because drying time changes with humidity, construction, shade, and how much water the feeder absorbed. Refill only when the wood, seams, and corners are completely dry to the touch. If the feeder has deep cracks, delaminating plywood, soft rotten wood, or areas you cannot clean and dry, replacement may be more sensible than repeatedly trying to rescue it.
Structural Fixes to Stop Recurrence
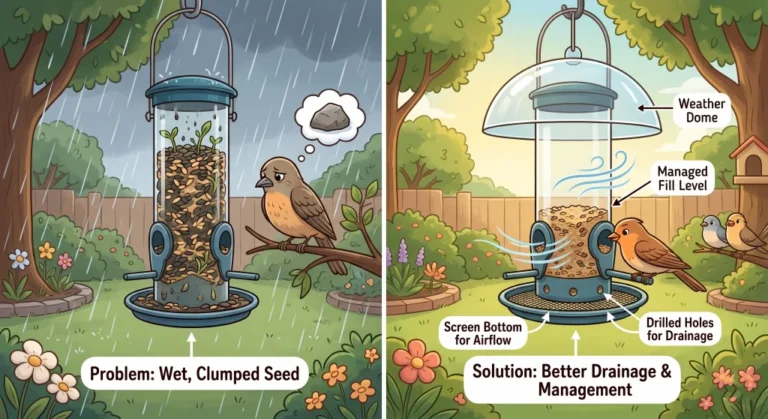
Cleaning solves the current contamination. Preventing the next one means fixing moisture and turnover. I look first at whether rain can reach the seed, whether water can drain out, and whether the feeder holds more food than the birds can consume before weather gets to it.
Drainage matters because water that enters a feeder should not be allowed to pool under the seed. Screened bottoms, open drainage paths, and trays that do not trap water make a setup easier to keep dry. They do not make soaked seed safe again, but they reduce the amount of time stray moisture sits against the food. If your feeder repeatedly develops wet clumps at the same low point, that is a design problem worth addressing.
Fill level is the next lever. In hot, wet, or slow-feeding periods, I put out less seed and refill more often rather than filling a large reservoir to the top. The reason is turnover, not a magic surface-area formula. A smaller amount is eaten sooner, spends less time exposed to humid conditions, and costs less to discard if a storm gets into the feeder. The South Carolina DNR similarly advises offering only what birds will eat quickly, especially during wet weather.
Overhead protection can help with direct rain, but a weather guard is not a humidity shield. In a humid climate, a dome works best as one layer alongside drainage, smaller fills, and more frequent checks. If you are already dealing with recurring bird feeder seed problems, watch where the first damp clump appears. That location usually tells you whether the weak point is rain entry, trapped water, or seed sitting too long.

This hanging bird feeder combines a cylindrical mesh-style feeding body with a protective dome lid and a wraparound feeding area. It holds up to 2.5 pounds of seed and can be used with sunflower seed, mixed seed, and other common wild bird blends. The wide top opening makes refilling and routine cleaning easier, while the covered design provides some protection from sun and rain.
Check on AmazonIf you click this link and buy, we earn a commission at no additional cost to you.
The Overlooked Source: Your Seed Storage
Sometimes the feeder is not where the problem starts. Seed that was stored damp, smells musty when the bag is opened, or shows visible mold should not go into a cleaned feeder. Wildlife guidance also recommends keeping bird food in a cool, dry, water-resistant storage setup and cleaning containers or scoops that have held spoiled seed.
This is a pattern worth checking before you blame the feeder for a fast recurrence. If you scrub the tube, dry it completely, and immediately refill it from a bin that contains old damp residue, you have reintroduced the same bad food. Empty storage bins periodically, remove seed dust from the corners, and make sure the container itself is dry before pouring in a fresh bag.
I also avoid topping a fresh bag directly onto a layer of old seed at the bottom of a bin. Use up the older dry seed first, inspect the container, then add the new supply. If a new bag already smells sour or musty, or contains obvious damp clumps or fungal growth, I would return or discard it rather than trying to dry and reuse it.

Two stackable containers holding 11 lbs and 30 lbs with snap-lock airtight seals to keep food fresh and moisture-free. Clear body lets you check food levels at a glance. Includes a 2-cup scoop and rolling casters for easy movement. BPA-free, FDA-compliant, made in the USA.
Check on AmazonIf you click this link and buy, we earn a commission at no additional cost to you.
Breaking the Mold Cycle
When I find mold in a bird feeder, I think in two stages: remove the contamination, then remove the condition that caused it. Discard spoiled seed, scrub away organic material, disinfect with a proven method, rinse thoroughly, and let the feeder become completely dry before refilling. That handles the immediate problem without relying on mold color, smell alone, or a stronger-than-needed chemical mixture.
Then look at the setup itself. Better drainage, smaller fills during wet weather, overhead rain protection where useful, and dry seed storage do more for recurrence than repeatedly deep-cleaning the same moisture trap. A feeder that can be disassembled and dried easily is also much easier to maintain over the long term.
If the contamination is severe or you want the cleaning sequence in a narrower format, the linked section below takes you into the dedicated cleanup and prevention topics. For routine maintenance after the problem is solved, clean a bird feeder on a regular schedule rather than waiting for mold to become visible again.
FAQs
🧽 Can I just put my bird feeder in the dishwasher?
Only if the feeder manufacturer says the parts are dishwasher safe. Cornell lists a hot dishwasher as one cleaning option for suitable seed feeders, but plastics, adhesives, finishes, and removable parts vary. When in doubt, disassemble and wash by hand.
🌧️ How long does it take for bird seed to go bad after it rains?
There is no reliable twenty-four- or forty-eight-hour cutoff for a wet feeder outdoors. Temperature, humidity, drainage, seed type, and how thoroughly the food was soaked all change the timeline. If seed is wet and clumped, smells musty, or shows mold, discard it rather than trying to salvage it.
🦅 Will birds die if they eat moldy seed?
Moldy seed is a real health risk, but eating it does not mean a bird will automatically die. Wet and moldy seed or hull buildup is associated with fungal disease risks including aspergillosis, so remove contaminated food promptly and clean the feeding area.
🪵 How do you disinfect a wooden bird feeder?
Remove debris, scrub the feeder thoroughly, use an appropriate dilute cleaning or disinfecting solution, rinse it well, and let it air dry completely before adding seed. Wood can retain moisture longer than plastic or metal, so complete drying matters more than following a fixed number of hours.
🗑️ Should I throw away a feeder that got moldy?
Not automatically. A feeder can usually stay in service if it can be fully disassembled or reached for cleaning, scrubbed free of residue, rinsed, dried, and returned to sound condition. Replace it when cracks, damaged seams, rotten wood, or inaccessible crevices prevent reliable cleaning and drying.